| Revealing the Unseen | |
|---|---|
| |
Prerequisite |
Good Intentions |
Type |
Faction |
Quest Giver |
Savos Aren |
Location |
Mzulft |
Followed by |
Containment |
| Quest Objectives | |
Walkthrough
After speaking with the Augur of Dunlain, you know that you must find the Staff of Magnus. Asking around the college will lead you to the Arch-Mage, Savos Aren who will tell you that Mirabelle mentioned the staff just recently.
Speak with Mirabelle Ervine
Follow the quest marker to Mirabelle and speak with her. When you ask her about the staff, she will begin to get evasive, but keep pushing her and she will eventually tell you that she does not know where is actually is, but that some Imperials from the Synod came by and eventually left empty-handed, though not before finding out that the ruins of Mzulft held the answer to finding the Staff of Magnus.
Find the Ruins of Mzulft
The ruins are located south-east of Windhelm and north-west of Stony Creek Cave. Make your way there and enter the dungeon.
Search for the Synod researchers
Immediately after entering the first room, you will be given a quest to search for the Synod researchers. Here, you will find a dying (and very quickly dead) Synod researcher, Gavros Plinius, mentioning Paratus Decimius who fled to the Oculory. In his remains, you will discover a log which mentions a Focusing Crystal and the Oculory as well as a key that unlocks the complex.
Reach the Oculory
Following the suggested path to the Oculory, deep within Mzulft, open the door and go up the ramp and around the corner. In the corridor with brass fencing on either side, be wary of the pressure plate at the start that will cause spikes to come down from the ceiling. At the end of the trapped corridor is a dead Synod researcher. Continue around the corridor and there will be two Dwarven Spider Workers in the corridor beyond.
Keep going down the corridor and up a ramp into a room where you will be ambushed by two more Spider Workers. Open the door, go up another ramp and when you round the corner and head down that corridor a bit, you will be ambushed by yet another Spider Worker. Kill it and head through the door and you will find yourself in a cave system. At about the middle of the first passage, there will be an alcove with some Moonstone Ore veins and a pickaxe nearby.
Continue down the passage and you will come to a cavern with some scaffolding and a Chaurus there. Dispatch the Chaurus and continue down the passageway. Almost immediately past the shadowy part of the passage, will be a tripwire that triggers a rockfall up ahead. Further down, the passage will open into another cavern with a couple of Chaurus in it. If you time it right you can retreat and use the rockfall to damage the Chaurus for you. When they are dead, go up the earth ramp and back into the ruins.
Go through the door and up the ramp to your right. Turn left at the top and head towards a locked gate (adept) in front of you. You will be ambushed by a Dwarven Sphere from a pipe to your right. Continue down the corridor once the Sphere is dealt with till you come to another door. Beyond you will find a corridor filled with piping and a grated floor. In the room you will find a single Spider Worker. At the end of that corridor, you will be ambushed by another Sphere from your right.
When you enter a room with two levels, a Spider Worker will come up the stairs after you. Kill it and head down where it came from to find an Alchemy Lab and a locked gate (adept) down a short corridor. Go back up the stairs and turn left and open the door there. You will enter a room with a sort of pit in the middle. You can see a Sphere patrolling the far side of the pit.
The way across is a narrow ledge to the left hand side. There is a pressure plate in the middle that will send pistons out to push you into the pit. So you will have to wait for the pistons to retract before crossing. If you do get pushed into the pit, you will be ambushed by two Spider Workers. Go through the door at the far end of the pit when you are done. Go up a ramp and through the door into the Mzulft Boilery.
You will be at the base of a ramp with destroyed Dwarven Constructs. At the top of the ramp to your left will be a Falmer patrolling the cross corridor at the far end. Kill it and continue on up another ramp to the right. At the top of this ramp will be another Falmer (archer). Go down the corridor and up another ramp and you will enter a corridor system similar to the first. Turn right at the first junction and you will find a Synod researcher in a corner. There will be a Falmer patrolling to your left.
Go down the corridor and turn right to find another ramp with a Falmer (archer) at the top. Kill it and continue round the corner to a room with two Falmer (one archer) in it. In the room, there is a locked gate to the left (expert) and the exit to the right. Head into that room and you will be in a smaller room with an entrance leading into some tunnel in front of you. Head into the tunnel and you will meet with a chaurus at the end of the straight passage. To your right will be a small alcove with some Chaurus eggs.
Continue following the tunnel till the passage widens into an area with a Chaurus and a Falmer in it. In here you will find a Falmer tent with a chest inside. Go round the Falmer tent and continue following the tunnel and you will find another, bigger living area with two Falmer (one Skulker). Deal with them and go through the exit at the back of this area into another wide passage with a Chaurus inside. Immediately to the left of the exit, there will be a Falmer chest in the depression there. Get past it and enter the ruins again.
In the first room, there will be a Falmer patrolling. There will also be a locked room (master) to the right of the exit. In the following corridor, there will be another locked door (expert) in the middle right with a Falmer inside. The corridor will open out into a long hall with a trench in the middle. There will be two Falmer patrolling the far side of the trench. Following the outer edges of the trench, there will be a locked chest (novice) on the right. On the other side of the trench from where you entered, will be a room with a Chaurus inside. The exit is the door opposite where the chest was. Follow the corridor to a door leading to the Mzulft Aedrome.
When you enter the Aedrome, there is a ramp in front with a Falmer (archer) and Chaurus at the top. Follow the corridor till you get to a large cavern with 4 Falmer inside. There are 2 patrolling the lower area (one archer), a Gloomlurker patrolling the first landing, and another Falmer on the top landing. The two on the bottom can be fought individually but engaging the Gloomlurker will alert the last Falmer. The Gloomlurker has the Focusing Crystal that you need.
The hall has three exits. The one up the stairs to the left requires a key. The one directly in front is locked (master). So go down the exit to your right. Go through the corridor to a room at the end that has a Dwarven Spider in it. The chest in the room contains the key that you need. Go back to the big hall and unlock the door at the top of the stairs. Head up some stairs to another locked door (needs key) and Paratus Decimius will let you in. Speak to him and he will tell you about his experiments and ask you to go find the Focusing Crystal.
Find the Focusing Crystal
If you did not already loot the Crystal from the Gloomlurker, head back to the body and get it. Otherwise proceed to the next step.
Return the Crystal to Paratus
Tell Paratus that you have found the Crystal and he will ask you to follow him.
Follow Paratus
Just follow him down the corridor and he will lead you to the Oculory. Once the two of you reach the top, he will explain what needs to be done and ask you to place the Crystal in the cradle. A nearby ramp leads to a bank of buttons and a couple of spell tomes (Spell Tome: Flames and Spell Tome: Frostbite) on a table behind the bank of buttons.
Place the Crystal in the Oculory
The cradle can be found in the middle of the room, atop some supports. Just walk up to it and activate it to put the Crystal in. Once you do so, Paratus will provide further instructions.
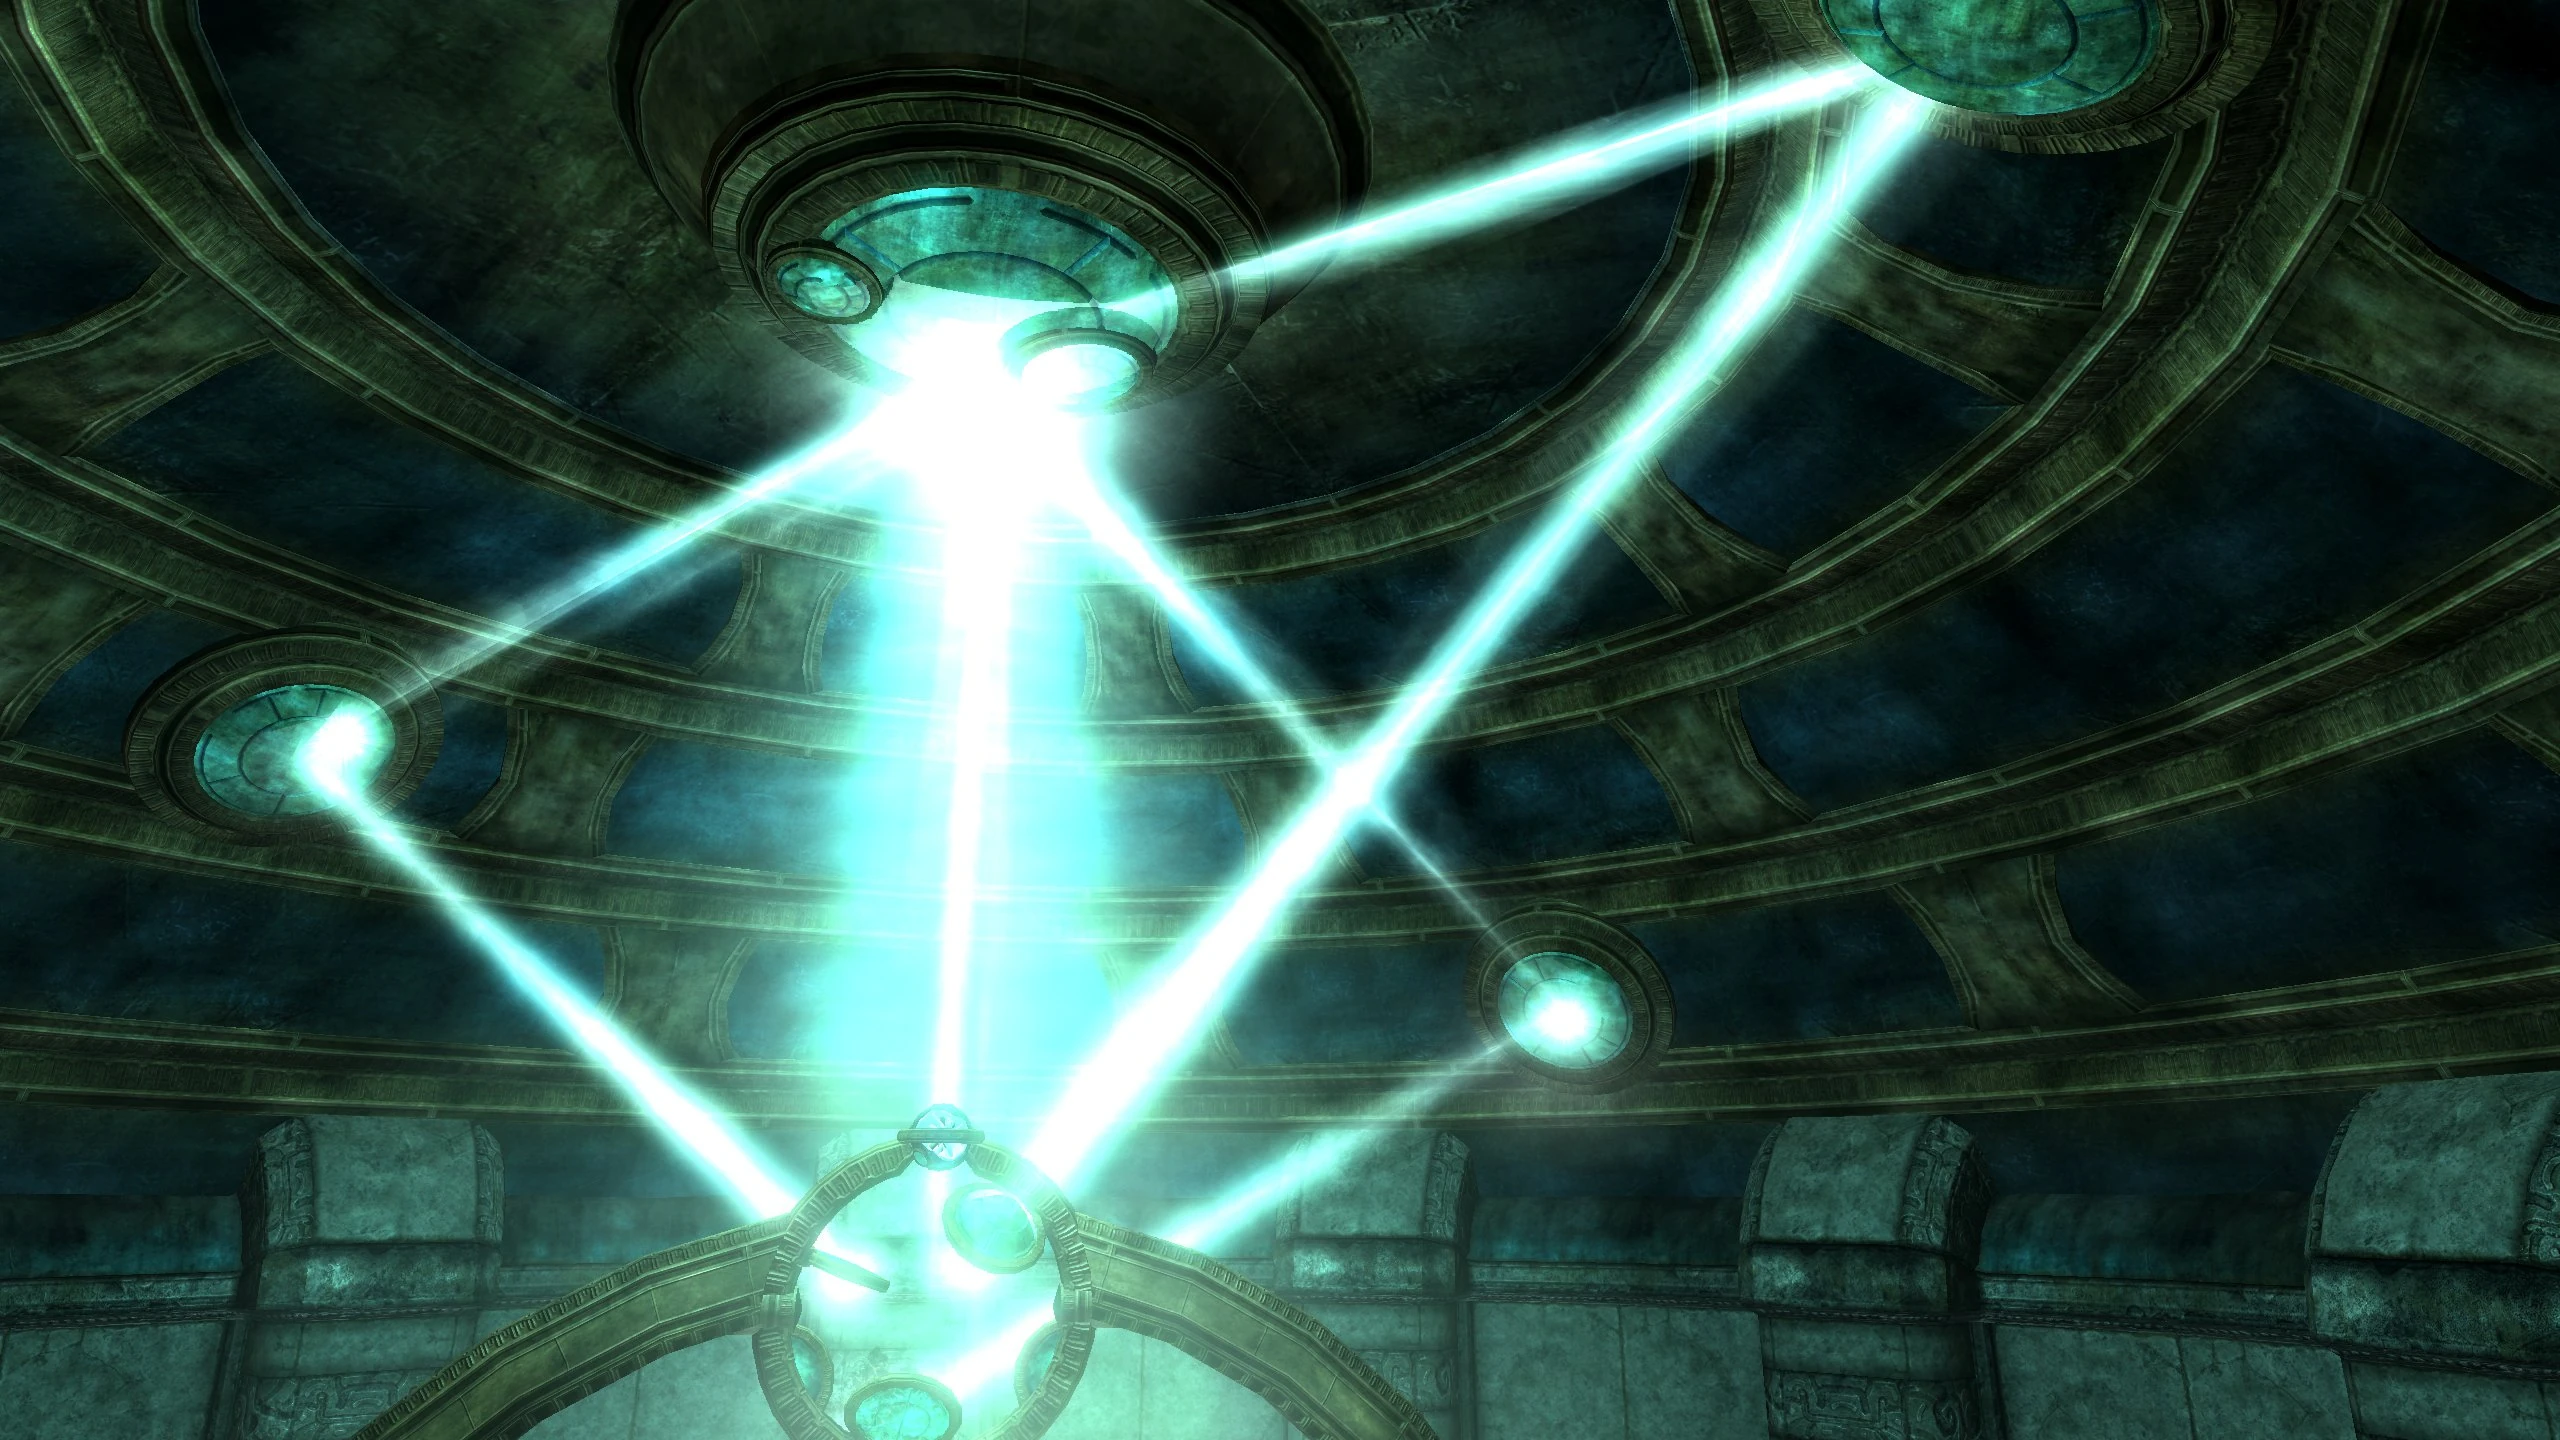
Focus the Oculory
You now need to focus the Crystal until the three beams of light being emitted from it are shining towards the centre of each of the tracks on the ceiling. Use either the Flames or Frostbite spell to focus the Crystal. If you do not have the spells, you can find the spell tomes on a table behind the bank of buttons at the top of the ramp.
Once the beams of light are in place, press each of the buttons until the lenses located on the ceiling are aligned with the light. When this happens, go to speak to Paratus for the results.
Talk to Paratus
Paratus will be very excited that it has worked. But the excitement only lasts until he finds out that there are massive sources of interference preventing the Oculory from making proper readings on the locations of all magical objects in Skyrim. Two locations are pointed out, one being the College (because of the Eye) and the other being Labyrinthian, where the Staff of Magnus is located. At this point, you can choose to reveal some information about the Eye of Magnus to Paratus, or not.
Report to Savos Aren
Nerien will once again appear and tell you to get back to the College as quickly as possible. Exit the dungeon and head back to the College. Enter the Hall of the Elements to find Savos and Mirabelle outside of a magical barrier. It seems Ancano got up to no good while you were gone. Tell Savos what happened and he will tell you to help them break the barrier, which can be accomplished by using any destruction spells, until the barrier goes down. Savos will attack Ancano. There will be an explosion and you will black out for an instant. Find Mirabelle and she will ask you to find Savos who was actually engulfed by the explosion.
Reach Ancano
Once inside, you will see that Ancano is casting some spell at the Eye of Magnus and that Savos and Mirabelle want him stopped. As you try to help, you will be blasted unconscious.
Once you awaken, you will see that Mirabelle is injured (though not fatally) and that Savos is gone and the quest "Containment" will begin.